Treatment Record:
SPEED brackets were bonded 7-7 in the upper arch. In the lower arch, SPEED brackets were bonded 5-5, with SPEED
buccal tubes bonded to the lower molars. Metal anterior bite ramps were bonded to the upper centrals at the initial
bonding appointment to prevent interference between the upper incisors and lower anterior SPEED brackets. Use of
metal anterior bite ramps has since been discontinued in my practice. My current preference is to build a composite
bite shelf on the lingual surface of the central incisors in cases where posterior extrusion is required to increase lower
facial height and correct overbite while preventing traumatic occlusion.
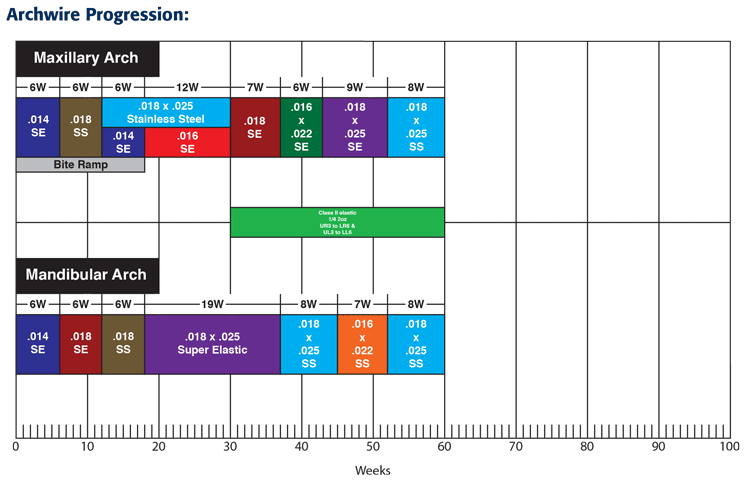
Maxillary Arch:
Tooth movement was initiated with a light .014 Nickel Titanium archwire. At week 6, a .018 Stainless Steel wire was
placed to continue levelling and an open coil spring was placed to create space for the upper canine. At week 12,
a .018 x .025 Stainless Steel archwire was placed to establish anchorage and to act as support for an .014 nickel
titanium sectional wire that was placed to engage the impacted canine. A SPEED bracket was bonded at the tip
of the impacted canine (13) to begin the orthodontic traction. At week 18, bite ramps were removed and the .014
sectional wire was replaced with a .016 Nickel Titanium sectional wire. At week 30, the canine bracket was rebonded
in the ideal position, and was engaged by a .018 Nickel Titanium archwire, which was placed 7-7 to complete
alignment. Light Class II elastics were used to maintain the Class I molar relationship. At week 37, a .016 x .022
Nickel Titanium archwire was placed to establish archform, followed by .018 x .025 Nickel Titanium, combined with
elastic chain 7-7 to close space, and to continue to correct the archform. At week 52, a .018 x .025 Stainless Steel
wire was used to finish the case, finalize arch coordination and levelling, and establish proper occlusion.
Mandibular Arch:
Alignment and levelling of the lower arch was carried out over a 18-week period using .014 Nickel Titanium
archwire, followed by a .018 Nickel Titanium archwire, and finally with a .018 Stainless Steel archwire. A .018 x .025
Nickel Titanium archwire was then placed to establish archform, initiate torque, and correct the curve of Spee. This
was followed by a .018 x .025 Stainless Steel archwire. At week 45, a .016 x .022 Stainless Steel Wire was placed to
address a bond failure and subsequent relapse of tooth number 37. This wire stayed in place for 7 weeks, at which
point a .018 x .025 Stainless Steel archwire was placed to finish the case.
As proper posterior occlusion had been achieved with good final torque positions, cuspid rise, and overbite / overjet,
it was unnecessary to progress to a Stainless Steel wire larger than .018 x .025 to finish the case. Further, in the
lower arch, I was concerned that advancing to a larger archwire may have excessively torqued the lower anteriors
and compromised lip support. |